Git help!

In dedication to my awesome colleagues at Ahold, I hereby present some of the most frequent questions asked questions about git.

Help, I broke my code

Help I broke my code and just want to get it to work again! All changes I’ve made are allowed to be discarded.


$ git fetch origin
$ git reset --hard origin/master

Help, I started my branch from the wrong point

Help I started coding and only realized now that my branch started from the wrong branch! I made some changes that I want to have preserved!


$ git commit -a
// enter useful commit message here
$ git fetch origin
$ git rebase -i origin/master
// remove any commit you do not want by deleting that line
// or you can change pick to d or drop

Help, I am messing up my rebase

Help I am in the middle of my rebase, but things are going south! I want to reset to the state before I started to rebase.


$ git rebase --abort

Help, I messed up my rebase

Help I messed up my rebase and want to revert back to the state before the rebase happened! The rebase has concluded.


$ git reflog
// find the line with rebase (start)
// copy the hash
$ git reset --hard #hash#

Help, I see duplicate commits

Help I see duplicate commits and I want them removed! I started the branch from reference X.


$ git rebase -i x
// change all commits that are duplicated from pick to fixup

Help, I need to update my branch with master

Help I need to update my branch with master!


$ git fetch origin
$ git rebase origin/master

Help, I need to update my branch with the branch on the repo

Help I need to update my branch with the branch on the repo! My colleague has already made changes and rebased on top of master!


$ git fetch origin
$ git rebase -i origin/master
// remove all commits that do not belong to you in this list
// ideally there should be any, git should be able to resolve
// most duplicate commits

Help, there are a lot of files that should not be committed

Help I see a lot of files that are not part of the repo!


$ git clean -df
// optionally add the files to your .gitignore

Help, I made a lot of changes, but I only want to commit a part of it

Help I made a lot of changes while I was in the flow, but I only want to commit a few changes from this!


$ git commit -p
// mark the changes you want to commit with y
// mark the changes you don't want to commit with n

Merging with Rebase

Before I can explain the concept of resolving a merge conflict during a rebase, I need to elaborate a little about how and why merge conflicts occur.

What happens during a rebase?

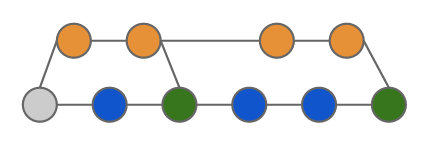
The reason we want to rebase, is to move our commits to the top of a TARGET branch. Let’s take this history as a scenario:

* c293e3a updated library `Y` dependency version
* 339ac3c moved and renamed foo.js to src/bar.js
| * 9e538b9 renamed class `Foo` to `Bar`
| * 71c8156 added new external library `X`
| * 448624b `baz` function now uses the validation provided via `X`
|/
* 2b3b44a baz now submits records via XHR

After a rebase we should achieve the following history:

* 9e538b9 renamed class `Foo` to `Bar`
* 71c8156 added new external library `X`
* 448624b `baz` function now uses the validation provided via `X`
* c293e3a updated library `Y` dependency version
* 339ac3c moved and renamed foo.js to src/bar.js
* 2b3b44a baz now submits records via XHR

When rebasing you will see the message:

First, rewinding head to replay your work on top of it...

What it actually does is resetting the HEAD to point to the hash you want to rebase on:

$ git reset --hard TARGET_HASH

Now that the HEAD is the same as your TARGET, all commits that do not exists on the TARGET will be re-applied.
When performing an interactive rebase, you will be presented with a list of commits that will be re-applied:

pick 9e538b9 renamed class `Foo` to `Bar`
pick 71c8156 added new external library `X`
pick 448624b `baz` function now uses the validation provided via `X`

What actually happens are cherry-pick's, picking the commits from the list, top to bottom, one by one:

$ git cherry-pick 9e538b9
$ git cherry-pick 71c8156
$ git cherry-pick 448624b

Which results in a happy case as:

Applying: renamed class `Foo` to `Bar`
Applying: added new external library `X `
Applying: `baz` function now uses the validation provided via `X`

Merge conflicts, HELP?!

There are several types of conflicts. Unfortunately there is no silver bullet. Let’s identify them and resolve them accordingly.

File content conflict

This is the most common merge conflict. In a git merge the end result of the two targets will be presented as one big blob of changes.
There is no information on how the changes got to this point. This makes merging very knowledge heavy.
If you are not involved with the changes causing the merge conflicts, you’ll probably have a difficult time resolving the conflicts alone.

Now git rebase applies commits one by one. This also means you will be resolving conflicts 1 commit at a time.
This gives you a context for the conflict. Our first commit is a rename of the class Foo to Bar.
This means other files might have updated the reference to this class as well. If in the TARGET branch the constructor has changed, you’ll get a conflict.

<<<<<<<<<<<<<
// changes applied by target branch
const foo = new Foo('baz');
==============
// how the code looked like from their common ancestor
const foo = new Foo();
==============
// the changes applied by `renamed class Foo to Bar`
const bar = new Bar();
>>>>>>>>>>>>>>

Now the conflict has a lot of context. Even when looking at these changes for the first time, it is simple to deduct how this conflict should be resolved:

const bar = new Bar('baz');

Let's continue our rebase:

git add
git rebase --continue

The next conflict that occur is with the commit: baz function now uses the validation provided via X

<<<<<<<<<<<<<
// changes applied by target branch
foo.baz(1, 2, value);
==============
// how the code looked like from their common ancestor
foo.baz(1, 2);
==============
// the changes applied by `baz` function now uses the validation provided via `X`
bar.baz(1, 2);
>>>>>>>>>>>>>>

Once again, we have a context around our conflict. We can reason what the result should be.
This demonstrates how commits that are sensible can help resolving conflicts.

Changes already applied

These are conflicts are are easiest to resolve. However the message provided by git might seem scary at first.

First, rewinding head to replay your work on top of it...
Applying: added new external library `X`
Using index info to reconstruct a base tree...
M package.json
Falling back to patching base and 3-way merge...
No changes -- Patch already applied.

Since the changes of this commit are already applied, we can skip this commit all together:

$ git rebase --skip

Often conflicting files

Some files are prone for conflicts. Imagine a package.json dependency that has a dependency that gets updated frequently.

"some-uber-cool-dep": "1.3.44"

It could happen that your branch has the dependency updated, but on the TARGET branch the dependency is even further:

<<<<<<<<<<<<<
// changes applied by target branch
"some-uber-cool-dep": "1.3.44"
==============
// how the code looked like from their common ancestor
"some-uber-cool-dep": "1.3.40"
==============
// the changes applied by
pick 71c8156 added new external library `X`
"some-uber-cool-dep": "1.3.43"
>>>>>>>>>>>>>>

Now we could simply skip this commit, as the changes that would be applied make no sense anymore.

$ git rebase --skip

File moved and renamed conflict

This is probably the most difficult to resolve conflict, a file that you've edited has moved and renamed. The description is also most cryptic to understand:

Merging:
foo.js

Deleted merge conflict for 'foo.js':
{local}: deleted
{remote}: modified file
Use (m)odified or (d)eleted file, or (a)bort?

Git is unable to relate the changes to the same file. We can help git by performing a rename in our branch before our other changes. To do this we are going to first abort the current rebase:

$ git rebase --abort

The first commit where we edited foo.js was 3 commits ago. To edit this commit, we have to point the rebase at least one commit before the to be edited commit.
Git provides a shortcut with HEAD pointing to the current commit and ~n for the amount of commits you want to go back:

$ git rebase -i HEAD~4

We would want to mark the first commit to be edited. Keep in mind, the changes from the following commits will be applied after.
To mark a commit to be edited, change the pick to e:

e 9e538b9 renamed class `Foo` to `Bar`
pick 71c8156 added new external library `X`
pick 448624b `baz` function now uses the validation provided via `X`

The rebase will apply the commit and wait for your changes:

Stopped at 9e538b9... renamed class `Foo` to `Bar`
You can amend the commit now, with

git commit --amend

Once you are satisfied with your changes, run

git rebase --continue

Now rename the file to what it has be renamed to on the TARGET. Now we amend the commit and continue with the rebase:

$ git commit -a --amend
$ git rebase --continue

The following commits will be applied on the renamed file. Now git will be able to associate the changes to the move.
So the rebase on the target should now apply our commits without the cryptic error message!

Blame, don’t shame!

Occasionally a tester reports a bug which is not introduced in the last commit. After investigating the bug the cause is found, but what to do? Most version control systems support a tool called blame. This however requires you to first find the code behind the bug. So after you find the cause, knowing who did this is only going towards a shaming situation.

git bisect

In most cases finding the cause of a bug is most time consuming, so how can we optimize this? How can we stop blaming, just for shaming? git bisect is a helpful tool which can help us achieve these goals.

Bug report!

Let’s imagine a scenario where the following bug is reported:

Given a user is on the checkout page,
when hovering over the help icon
then the help text is not visible,
but we expected the help text to be visible!

Test to identify

In this scenario the tests are run with grunt, karma and ngScenario. In grunt we configured a task to run all our tests: 

grunt test

To automatically see if the bug is present, it is best to write a test to confirm the case. For this example’s sake, this test case will be called confirm case.

Preparations

In this scenario, there are biweekly sprints, where each sprint will have a new release. The last release didn’t have this bug, which will serve as a reference for git bisect. For this example, the sha for the release tag is #tag.

To start the analyses, run:

git bisect start

Then let git know the current commit is broken:

git bisect bad

Tell git the first correct commit:

git bisect good #tag

Analyse

With git bisect git will checkout commits between the first good commit and the current bad commit. On every checkout git is able to run some commands to tell if the checked out commit is good or bad to narrow down the search to the first bad commit. Aka the commit that introduced the bug! With the help of the automated tests git can automatically find the first bad commit for us:

git bisect run grunt 

Blame

Now that the first bad commit has been identified, it is easy to find the cause if the commit messages make sense! In this example:

Author: Bob
Renamed the ‘buynow’ directive to ‘checkout’. 

To initialize the new directive include this tag in your view:
“`html
<div data-checkout=”checkoutid” />
“`

Resolve

Now that the commit is found, we have the following information:

  • The change set that introduced the bug
    Obviously this change set is a lot smaller compared to all changes made from the tag till the bad bug
  • The commit message with useful information about what the change was made for
    When a commit message is scoped to just this change, it is easy to understand why something is changed
  • The author of the commit
    If there are still misunderstandings, the author is known and hopefully can explain some decisions to resolve the bug

In this example the css for showing the help text is bound on the attribute:

[data-buynow]:hover { … }

This caused the hover to not work anymore and the fix is just renamed the selector as well!

Conclusion

With git bisect bugs can be debugged more easily and straight forward. When someone is blamed, this person is not shamed. This person is then instead asked for his knowledge on this commit, rather then just pointing a finger!

Solve the problem as a team 🙂

Another git merge strategy

Intro

There are so many ways on how to utilize git and each has their own advantages and disadvantages. After playing with several strategies I found one that suits my needs and want to share this strategy, to maybe improve or get even more idea’s to an even better suiting strategy.

Rebasing vs Merging

The main goal of both rebasing and merging is to combine different change sets into one. Even though they serve the same purpose, they are still very different. 

Merging

With merging you will create a new commit with the result of the merge between the branches. This merge commit is kept by git as a reference point for the next time git wants to resolve a merge conflict.

Merge Example

git merge

In this example a feature branch is being merged two times back into a master branch. When resolving the first merge conflicts these resolutions will be saved in the first (green) merge commit. When merging the feature branch for the second time, git will recalculate from the first (green) merge commit. The second (green) merge commit will only have to merge the last two (orange) feature branch commits with the (blue) master commits.

Rebasing

When resolving merge conflicts with a rebase, there won’t be a merge commit. Instead the merge conflicts will be resolved on the commits themselves.

Example

before_rebase

Same as with merging we have commits in a feature branch.

first_rebase
When rebasing the changes of the feature branch will be applied on top of master.

before_second_rebase

The next rebase will be applied on top of those changes again.

rebase_result

The end result will be a linear log of changes.

Rebasing for a cleaner log and more

Rebasing will result in a cleaner log, but there are more benefits for rebasing over merging. For instance your merge conflicts will be resolved on commit basis, where as the merge will be one huge change set of all changes combined into one big merge party. Other tools like bisect will also work a lot better, since the commits are actually preserved in a linear history.

For more more awesome info about commit messages, here is an nice post explaining how commit messages can be very usefull: deliberate-git

Feature branches

Imagine working on a new feature. During your development, you notice there is a bug in the code you would want to fix before finishing your new feature. We can simply create a new branch, branched from the stable master and apply this bug fix. Now we switch back into our local branch containing the changes we made up until we found the bug and continue. How awesome is that?

Applying the bug fix, could cause you to not being able to finish your feature on this day, but you still want to share your code with the rest of your team. You can’t push this to the master, as you want only stable code in the master branch… No worries, we can push the commit to a Feature branch!

Pausing/Dropping

An additional advantage would be when problems occur while developing this feature, either from business side or from technical side, the feature can be paused or even dropped at any time. Preventing risks of having a release of other features postponed.

Testing

We only want stable code in our master branch and Feature branches can help us achieve that. The feature can be tested isolated from any other parallel developed feature.

Local pulling

Ideally we would want even stable code in the feature branch, which would allow test suites to be run at every commit in the feature branch for even more feedback. However in the previous example, a commit was pushed which would break tests.

Pulling from a local machine is one of the solutions which I prefer. In order to pull from a local machine, the developer hosting the files, must start the daemon first. This forces awareness. When you are pulling from a local machine, you are more aware of the fact that you might actually pull something in which is not stable.

before_local_pulling

This allows for even tighter collaboration between the developers. Being able to commit not working changes, allows smaller commits which would not work separately but would work when combined with the commits of the other developers. 

rebase_local_pull

After pulling and finishing the changes on a local machine, we can squash the commits into one working commit and share this in the feature branch to allow QA to test these changes. (Note: Squashing commits means rewriting those multiple commits and commit them as if they were one commit)

squashed_commit

After QA has tested and approved the feature, we can squash the bug fixes into grouped commits. Don’t simply merge all commits into one commit, but merge them into sensible commits.

Knowledge Sharing

By working on a feature with such small tasks, each team member learns more about the feature being implemented. Instead of having three features implemented separately by three developers, the three developers could develop a bit of each feature instead, spreading the knowledge of the feature as well as having the feature earlier testable.

Conclusion

Cleaner log + applying commits one by one = resolving conflicts more easily

With the help of rebasing, we create a log history that is easy to read. Rebasing applies the changes commit for commit on top of the changes made in an other branch.

Parallel development + Feature branches = Flexible release scope

With the help of feature branches we can group commits together and squash  them into sensible commits to keep the log even more clean. Features won’t be blocking each other from being released anymore and if needed they can be dropped entirely.

Sequential Feature development + local pulling = More knowledge + Earlier testable feature

With the help of pulling from local repositories we can work even more closely on features. Sharing more knowledge among the team and preventing QA from having to test all features at the end of the sprint!

Inheritance in Javascript

Define Inheritance

Before I dive into Inheritance in Javascript, lets first define what I understand under inheritance.

  • Inheriting the implementation of an Object or Class
  • Being able to override the inherited implementation
  • Able to keep things private to the Object or Class
  • Able to keep things private, but still accessible for inheriting Objects or Classes
  • Able to access the super Object or Class

Lets see how this is done in javascript, with help of my own library EnoFJS!
(Link to EnoFJS)

Creating an Object or Class

The in my opinion BAD way:

function Animal(){}
Animal.prototype = {
name: 'animal',
sayHello: function sayHello(){
return 'Hi, my name is ' + this.name + '!';
}
};
function Dog(){}
Dog.prototype = new Animal();
var dog = new Dog();
dog instanceof Animal; //True
dog.sayHello(); //Hi, my name is animal!
view raw gistfile1.js hosted with ❤ by GitHub

Why do I think this is a bad way of inheriting? Because all functions you put on the prototype, can only access public available properties and functions.

The way with EnoFJS:

var Animal = clazz(function Animal(){
this.private = {
name: 'animal'
};
this.public = {
sayHello: function sayHello(){
return 'Hi, my name is ' + this.private.name + '!';
}
};
});
var Dog = clazz(function Dog(){
this.extend = 'Animal';
});
var dog = new Dog();
dog instanceof Animal; //True
dog.sayHello(); //Hi, my name is animal!
dog.name; //undefined
view raw gistfile1.js hosted with ❤ by GitHub

Overriding, but keep things private to the parent

Continuing the BAD way:

function Animal(){}
Animal.prototype = {
name: 'animal',
sayHello: function sayHello(){
return 'Hi, my name is ' + this.name + '!';
}
};
function Dog(){}
Dog.prototype = new Animal();
Dog.prototype.sayHello = function sayHello(){
return 'Hello, my name is ' + this.name + '!';
};
var dog = new Dog();
dog instanceof Animal; //True
dog.sayHello(); //Hello, my name is animal!
view raw gistfile1.js hosted with ❤ by GitHub

Notice that the name is not private!

The way of EnoFJS:

var Animal = clazz(function Animal(){
this.private = {
name: 'animal'
};
this.public = {
sayHello: function sayHello(){
return 'Hi, my name is ' + this.private.name + '!';
}
};
});
var Dog = clazz(function Dog(){
this.extend = 'Animal';
this.public = {
sayHello: function sayHello(){
return 'Hello, my name is ' + this.private.name + '!';
}
};
});
var dog = new Dog();
dog instanceof Animal; //True
dog.sayHello(); //Hello, my name is undefined!
dog.name; //undefined
view raw gistfile1.js hosted with ❤ by GitHub

Notice that this.private.name is only accessible for the original and therefor is resolved as undefined for the dog!

Protected

As displayed above, the “common practices” for inheritance in javascript, don’t really handle privacy very well. However this doesn’t mean it is impossible to achieve this, which is shown with EnoFJS. An even more tricky concept for accessibility is the protected accessibility. Through the EnoFJS library it is made possible:

var Animal = clazz(function Animal(){
this.protected = {
name: 'animal'
};
this.public = {
sayHello: function sayHello(){
return 'Hi, my name is ' + this.protected.name + '!';
}
};
});
var Dog = clazz(function Dog(){
this.extend = 'Animal';
this.public = {
sayHello: function sayHello(){
return 'Hello, my name is ' + this.protected.name + '!';
}
};
});
var dog = new Dog();
dog instanceof Animal; //True
dog.sayHello(); //Hello, my name is animal!
dog.name; //undefined
view raw gistfile1.js hosted with ❤ by GitHub

Super and Constructor!

Something even more rare in the world of javascript, is the super access. Access to the method of the parent:

var Animal = clazz(function Animal(){
this.private = {
name: 'animal'
};
this.public = {
sayHello: function sayHello(){
return 'Hi, my name is ' + this.private.name + '!';
}
};
this.constructor = function constructor(name){
this.private.name = name;
};
});
var Dog = clazz(function Dog(){
this.extend = 'Animal';
this.public = {
sayHello: function sayHello(){
return this.super.sayHello() + ' How are you?';
}
};
this.constructor = function constructor(name){
this.super.constructor(name);
};
});
var dog = new Dog('Brian');
dog instanceof Animal; //True
dog.sayHello(); //Hello, my name is Brian! How are you?
dog.name; //undefined
view raw gistfile1.js hosted with ❤ by GitHub

After match

  • Inheriting the implementation of an Object or Class
    Easy achievable without a library
  • Being able to override the inherited implementation
    Achievable without library, but no private scoping
    With EnoFJS, it is achievable even with private scoping!
  • Able to keep things private to the Object or Class
    So far I’ve only seen it made possible with BackboneJS and EnoFJS
  • Able to keep things private, but still accessible for inheriting Objects or Classes
    Something I have only seen with EnoFJS
  • Able to access the super Object or Class
    Something I have only seen with EnoFJS

Conclusion

Javascript is so dynamic, it opens so many possibilities! With the help of a little library(less then 2kb), we are able to do full inheritance with private, protected and even super access!